¡Bienvenidos a mi blog! Las diseñadoras de Joy Clair comenzamos a enseñar los sets correspondientes al Holiday 2020 Release. Vamos a hacerlo poco a poco durante varios días.
Welcome to my blog! The Joy Clair designers began to show the sets corresponding to the Holiday 2020 Release. We will do a sneak peak for several days until all the news is revealed.
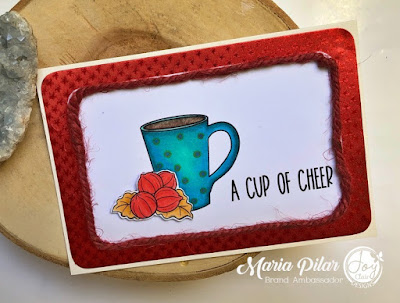
Mi primera tarjeta está creada con el set Coffee Flavors. Al final veréis todos los elementos que tiene para distintas ocasiones y a cuál más bonito. Este mes, además, tenemos una colaboración con Rinea Foiled Paper que he utilizado en mi proyecto.
Escogí la taza que viene con esta fruta que confieso que no sé cómo se llama, pero la he visto en muchos postres. La imprimí dos veces y le añadí en word el mensaje. Recorté la fruta de la segunda taza y después de colorear las dos, pegué una sobre otra con cinta foam de doble clara para darle dimensión. Previamente había coloreado la taza en tonos azules verdosos añadiéndole unos puntos decorativos.
La cartulina blanca donde está estampado el sello tiene sus bordes redondeados.
I created my first card with the Coffee Flavors set. At the end you will see all the elements that it has for different occasions and which one is more beautiful. This month we also have a collaboration with Rinea Foiled Paper that I used on my project.
I chose the cup that comes with this fruit that I confess I do not know what it is called, but I have seen it in many desserts. I printed it twice and added the message to it in word. I cut out the fruit from the second cup and after coloring both of them, I glued one on top of the other with double clear foam tape to give it dimension. She had previously colored the mug in greenish-blue tones by adding some decorative dots.
The white card on which the stamp is stamped has rounded edges.
A continuación pegué esta cartulina blanca sobre un papel de Rinea al que también redondeé las esquinas. Me apetecía darle un toque rústico y pegué un trozo de lana gruesa en todo el borde de la cartulina con la imagen.
Next I glued this white card onto a Rinea paper which I also rounded the corners. I wanted to give it a rustic touch and I glued a piece of thick wool around the edge of the cardboard with the image.
Después coloreé las imágenes con rotuladores Copics y lo dejé aparte.
My second project for this occasion is the Barrels set. I prepared the design you see in Word. On the one hand, I attached the pumpkins to the barrel and, on the other, I placed the message on both sides by cutting them into an arrow shape.
Then I colored the images with Copics markers and set it aside.
To create the background, I embossed one of Rinea s plain color papers. I cut out some of the sheets from the emboss folder and pasted them over others to add dimension to my card.
And here you have the final result.
Espero que te hayan gustado mis proyectos para este Holiday 2020 Release.
Te agradezco la visita y te deseo una muy feliz semana. ¡Hasta pronto!
Thanks for stopping by and I wish you a very happy week. See you soon!


Q arte
ResponderEliminar